Showing posts with label handmade. Show all posts

Monday, 12 August 2013

Bloggers Lookbook July 2013

It's a bit late but finally here's my 3 favourite blogger looks from the last month, enjoy!

Bell's Fashion - Holiday Outfits: Day Seven

Photo belongs to Helena from www.bellsfashion.blogspot.co.uk

This two piece is undeniably beautiful but I was gobsmacked by the way Helena's styled it with chunky sandals and a lacey kimono - it shouldn't work but it really does! This gal makes mixing up high street, vintage and handmade pieces look easy peasy...but don't be fooled...it's a fine art and she's a pro. 


Photo belongs to Lydia from www.fashioninflux.blogspot.co.uk

There's nothing about Lydia that doesn't turn me green with envy - she's a classic beauty and has a wardrobe to die for! Her outfits tend to be pretty edgy but this simple look really caught my eye.Who else could pull off this quirky schoolgirl with such ease? Top of the class!

What Is In Her Wardrobe - Rottweiler

Photo belongs to Gemma from www.whatisinherwardrobe.blogspot.co.uk

Gemma's blog is a recent discovery for me and I'm an instant convert! Her vibe changes from post to post, from boho to high fashion, but she makes every look her own and stamps them with her own individual style. Colour blocking, gold detailing and that woofy tee make this an outfit to remember!

T x


Thursday, 8 August 2013

DIY: Above Knuckle Rings

The plain, silver above knuckle rings that I was wearing in my latest Primark haul video got  lotta loving and I thought I'd be good citizen and share their sneaky secret! 

5 Plain Silver Above Knuckle Rings - DIY
Others - Gifts/Primark/River Island
Nail Varnish - Barry M Gelly "Greenberry"

Above knuckle rings seem to be ridiculously overpriced in the shops at the moment and as someone who loses rings on a daily basis I refuse to pay £8 - £15 for a ring that will go missing next Saturday night. But I needed to get me paws on some of these rings, so I had a little think and ... BINGO!!


And now for the secret...these dupes are simply large jump rings, normally used for jewellery making! 


Would you have guessed?!

The only thing that gives them away is the join in the ring but that sits on the underside of my fingers anyway so no one is any the wiser! 

To decide which ones to order I measured the rough circumference of my middle finger and ordered these 18mm ones off Ebay. They fit perfectly on my second and middle fingers but are a little looser on my ring finger...meh. If you're worried about the sizing I would opt for a mm or so smaller than you think you need but make sure the rings are "open" so you can open or close them as you wish to fit each finger. I've lost a couple but at less than £2 for 20, that's hardly a problem!

So there we go! The secret is out and now you can all get some of these DIY beauties for yourselves...no one will ever know...

T x


Thursday, 30 May 2013

OOTD: Camel Racing


The title of this post is no joke. 

On Monday we travelled to a field in the middle of nowhere to go to a country fair type event with ferris wheel, candyfloss, dog shows and...yes...camel racing! 


I have honestly never seen anything like it! Camels are bloody enormous, definitely a lot bigger than I thought they were and they tower over a 6ft human. The jockeys were more used to riding ponies in gymkhanas than these mighty "ships of the desert" and looked absolutely terrified. As soon as they were mounted the camels were raring to go and then they were off!!


I do like camels. They have eyelashes to die for. But I don't want one as a pet. Thanks but no thanks.


Jacket - Primark (v old) with the sleeves hacked off
Dress - River Island £12 in the sale!

Hope you all had a b.e.a.u.t.i.f.u.l bank holiday weekend! 

T x


Video: Get Ready With Me for Field Day Festival May 2013


The Bank Holiday weekend was craaaaaazy good!

I went to Field Day Festival in Hackney on Saturday for a friends birthday. The weather was set to be wet and cold but we actually had beautiful sunshine alllll daaaaaaay. Honestly, there is nothing better than sitting outside drinking in the sunshine with your friends...bliss

So I got up at 7 am to make a "get ready with me" video before I left! Hell yes, that's dedication right there. I love these kinds of vids so thought I'd have a go at making my own. It's not the most interesting but if you fancy checking out how I did my make up/hair for the day check it out HERE

T x

Tuesday, 14 May 2013

OOTN: Can't Touch This

Saturday night was the time to take my new Celine-style tee out for a spin! 

It's taken me a good month or so to get hold of one of these bad boys. They've been bombing round the blogisphere for a couple of months now and as a result have been sold out on Ebay but my bad luck stopped the other week and I'm now a proud owner of my very own version!

ALIEN IN A T SHIRT ALERT!


T Shirt - Ebay 
Trousers - H&M (sale)
Shoes - New Look (v old)

Collar - Morrocco
Spiked Necklace - ASOS (old)
Name Necklace - mynamenecklace.com
Hamsa Hand - Morrocco
Teardrop pendant - Xmas present

I teamed my tee with burgundy faux-leather trousers, courts and some serious neck armour. I've been seeing a lot of necklace stacking going on on Instagram and have been meaning to hunt down some cheap necklaces to connect together  when I have the time - it looks so freaking cool! Everyone loves a good arm party so why not let your neck have one too?

Just a quick heads up...whole body parties + vodka aren't such a good look...!


What do you think about of these t-shirts and stacked necklaces?

T x


Sunday, 21 April 2013

DIY Red Velvet Bow

Yesterday I stumbled across a photo of the beautiful Bip Ling wearing a PPQ red velvet hair bow and fell in love. 

A rummage through the scraps box at home confirmed that this bow and I were meant to be as I found an old red velvet sash off one of my grandmothers old ballgowns (this wasn't cut up willy nilly, she was a size 4 ish during the war and her waist is a gazillion times smaller than mine will ever be!)...fate or coincidence, either works for me!

This took me about 45 mins to make and cost nothing, easy peasy. Obviously you could knock one of these up with any large scrap of material you may have lying around, denim or pleather would look amaaaaaaaaazing!

You will need:
  • A large piece of medium to thick weight material (the heavier the material, the better it will hold it's shape)
  • Tape measure or ruler
  • Sharp scissors
  • A glue gun
  • Pins
  • A needle and thread
  • A hair grip
1. Measure and cut the material for your bow and lay it out flat. Simples!
 For my pretty hefty bow I used a piece of velvet measuring roughly 12.5" x 8" but depending on what size you want your measures can be changeable.
As my material is originally from a sash it does have seams running through it but they don't really appear on the velvet side.

2. Use your glue gun along the long edges and fold them up about half an inch - just helps to keep things tidier.


3. Fold the material longways and pin the rough edges together.


4. Use the needle and thread to do a simple running stitch across the top - be careful not to pull your stitching too tight or it will gather the fabric.


5. Once  you've sown the top together, go over your last stitch a couple of times to finish it off and then turn the material inside out to form a tube of material, with the seam you've created in the centre of one side - this will be the back.


6.  Flatten the material and use your glue gun to close the open ends of the tube.


7. Using your thumb and first finger pinch the bow together so that it gathers to form a bow, then pop a pin through the top of the gather to the bottom to hold the shape.
Make sure that the gather is right in the centre of the bow otherwise it will end up looking a little lopsided.


8. Using the scraps from your original fabric cut a length approx 7" x 1.5" then use your glue gun to glue it in half lengthways. 
Remember that if you are using a material like velvet you will need to glue on the non furry side so that the velvety side will be on the outside of the bow. 

9. Dab a little glue on one end of your now shorter and sturdier ribbon of material and attach it to the top of the gather on the centre of the bow - just where you put the pin in to keep the shape. Take the pin out and wrap the rest of the ribbon round the bow tightly to hold the gathers and attach the other end just behind the end you have just stuck down. You should have created a ribbon that runs the whole way round the centre of the bow. 

It should look like this from the front. 

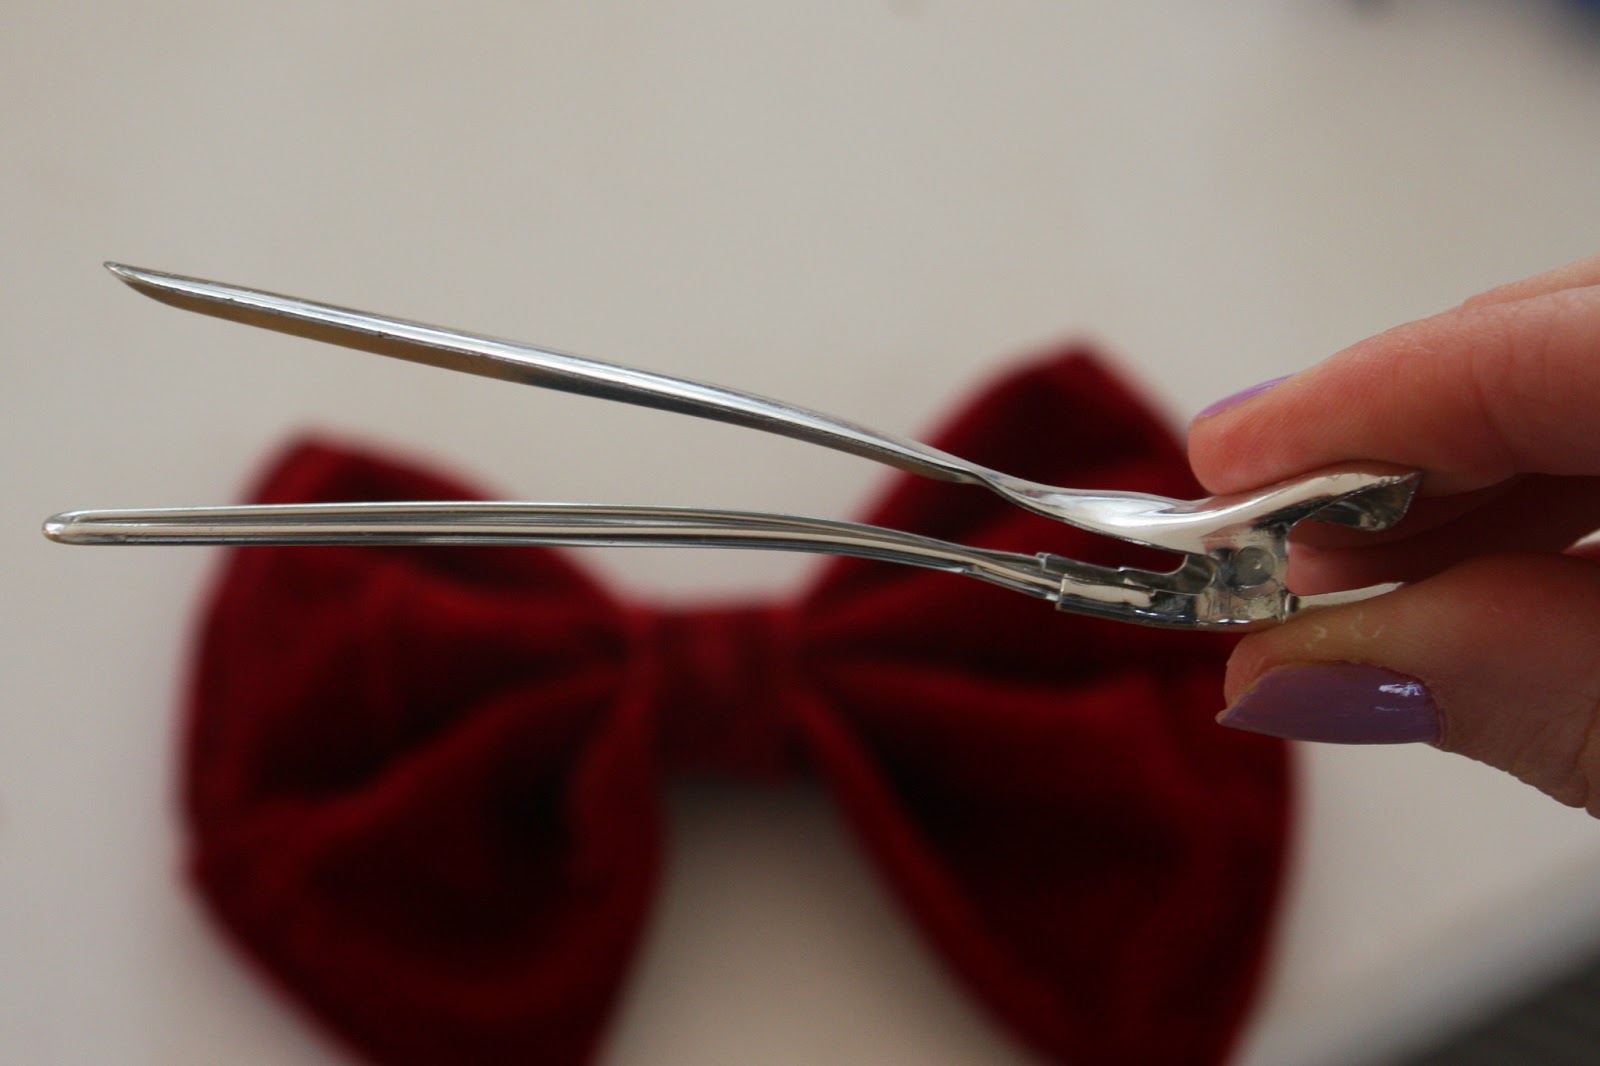
  10. Having created your bow you need to create a means to attach it to hair/clothes etc. As velvet is quite heavy I decided to use a large crocodile style grip that I found lying around which seems to work very well.  


I just slid the larger side of the pin (top side in this picture) underneath the central ribbon of the bow so it sits within the gathers.

Eh voila!


What do you think?


I love the way this brightens up a simple t shirt and am already scouting for a more summery material for my next one and oooooh maybe one with studs in...watch this space!

My beautiful pooch Hector wants one too!

 I'd love to know if any of you have tried making your own versions, just holler at me!

T x


Saturday, 6 April 2013

DIY Spiked Headband

Spiked headbands have been around for a while now. This ole bandwaggon has been steadily rolling down the road since Autumn/Winter 2012 and I have to admit I've only just caught up with it!


To be fair I'd been meaning to get hold of one of these Statue of Liberty-esque headpieces for aaaages but they all seemed to be ridiculously overpriced! The sparsely studded headbands in Topshop would have burnt a reasonably large hole in my pocket and, although it's each to their own, I just refuse to pay £14 for something that I could make myself. 

So that's how we ended up here.

This took me about half an hour to make and cost less than £7... *fist pump*

You will need:
  • 1 x elasticated headband, this needs to be flat so you can screw the studs into it - mine's an old H&M one that I'd had for years
  • Approximately 10 x Cone studs with screw on backs - easily obtained from Ebay or a haberdashery  
  • Sharp scissors


Firstly you need to poke evenly spaced holes through the headband with the end of the scissors. I left a 1cm gap between holes and covered the area of headband over my forehead.


Then it's just a case of unscrewing the base of the stud from the cone. 

I ended up using pretty hefty studs (about 2cm long from the base to the tip) and do wish that maybe I'd used slightly shorter ones - turns out a 2cm is considered "dangerous" and most bouncers aren't fans!


Once the bases are unscrewed simply push them through each hole from back to front


And finally, screw the cones back onto the bases...TA DAH!


Wear your handiwork with pride but avoid hugs and headstands!

I'd love to know if any of you have tried making one of these bad boys

T x


LOOKBOOK