Showing posts with label DIY. Show all posts

Monday, 18 November 2013

Funnybones


Skeleton T Shirt - Primark
Skirt - Primark
Boots - Truffle
Spiked Headband - DIY see post HERE


I picked up this t shirt and skirt in an October Primark trip (Haul video HERE) a while ago. They've been paraded as separates but a happy accident led them to be worn together and I actually quite like the contrast of the bold tee with the heavy textured skirt!

This headband is a DIY project I created  back at the start of the year (see post HERE) and it's had a lot less wear than I would like! Apparently turning up to a nightclub wearing a headpiece studded with 2 inch spikes makes you a danger to society...who knew?

T x 


Monday, 12 August 2013

Bloggers Lookbook July 2013

It's a bit late but finally here's my 3 favourite blogger looks from the last month, enjoy!

Bell's Fashion - Holiday Outfits: Day Seven

Photo belongs to Helena from www.bellsfashion.blogspot.co.uk

This two piece is undeniably beautiful but I was gobsmacked by the way Helena's styled it with chunky sandals and a lacey kimono - it shouldn't work but it really does! This gal makes mixing up high street, vintage and handmade pieces look easy peasy...but don't be fooled...it's a fine art and she's a pro. 


Photo belongs to Lydia from www.fashioninflux.blogspot.co.uk

There's nothing about Lydia that doesn't turn me green with envy - she's a classic beauty and has a wardrobe to die for! Her outfits tend to be pretty edgy but this simple look really caught my eye.Who else could pull off this quirky schoolgirl with such ease? Top of the class!

What Is In Her Wardrobe - Rottweiler

Photo belongs to Gemma from www.whatisinherwardrobe.blogspot.co.uk

Gemma's blog is a recent discovery for me and I'm an instant convert! Her vibe changes from post to post, from boho to high fashion, but she makes every look her own and stamps them with her own individual style. Colour blocking, gold detailing and that woofy tee make this an outfit to remember!

T x


Thursday, 8 August 2013

DIY: Above Knuckle Rings

The plain, silver above knuckle rings that I was wearing in my latest Primark haul video got  lotta loving and I thought I'd be good citizen and share their sneaky secret! 

5 Plain Silver Above Knuckle Rings - DIY
Others - Gifts/Primark/River Island
Nail Varnish - Barry M Gelly "Greenberry"

Above knuckle rings seem to be ridiculously overpriced in the shops at the moment and as someone who loses rings on a daily basis I refuse to pay £8 - £15 for a ring that will go missing next Saturday night. But I needed to get me paws on some of these rings, so I had a little think and ... BINGO!!


And now for the secret...these dupes are simply large jump rings, normally used for jewellery making! 


Would you have guessed?!

The only thing that gives them away is the join in the ring but that sits on the underside of my fingers anyway so no one is any the wiser! 

To decide which ones to order I measured the rough circumference of my middle finger and ordered these 18mm ones off Ebay. They fit perfectly on my second and middle fingers but are a little looser on my ring finger...meh. If you're worried about the sizing I would opt for a mm or so smaller than you think you need but make sure the rings are "open" so you can open or close them as you wish to fit each finger. I've lost a couple but at less than £2 for 20, that's hardly a problem!

So there we go! The secret is out and now you can all get some of these DIY beauties for yourselves...no one will ever know...

T x


Monday, 5 August 2013

Coco Made Me Do It


Something came over me the other day and I found myself trawling Ebay for a snapback I could call my own! They're not my usual style at all but when I saw this little beauty I just couldn't resist.


Cap - Ebay similar HERE
Top - H&M
Shorts - DIY
Shoes - Primark

Snapbacks are so far out of my comfort zone it took me a while to press "buy now" and actually add one to my wardrobe. I wanted one that wasn' too edgy hipster or sk8ter boi and this one had me at first glance. Whoever Coco is, she's a legend and I'm tempted to invest in one of these matching tees too...maybe wear them at the same time...maybe not...

I took my new baby out for a spin at a BBQ and it went down a storm with my buddies. I'd like to try pairing it with little dresses and chunky boots but it's going to take a while to pluck up the courage!

Hope you all had a good weekend! I'd love to know how you would style this cap, tell meeeee!

T x

Thursday, 11 July 2013

OOTN: Evening Sun

The other night I headed out to watch my friend's band play their first ever gig! They were incredible and it was a wicked night full of dancing and jagerbombbbbbbs!

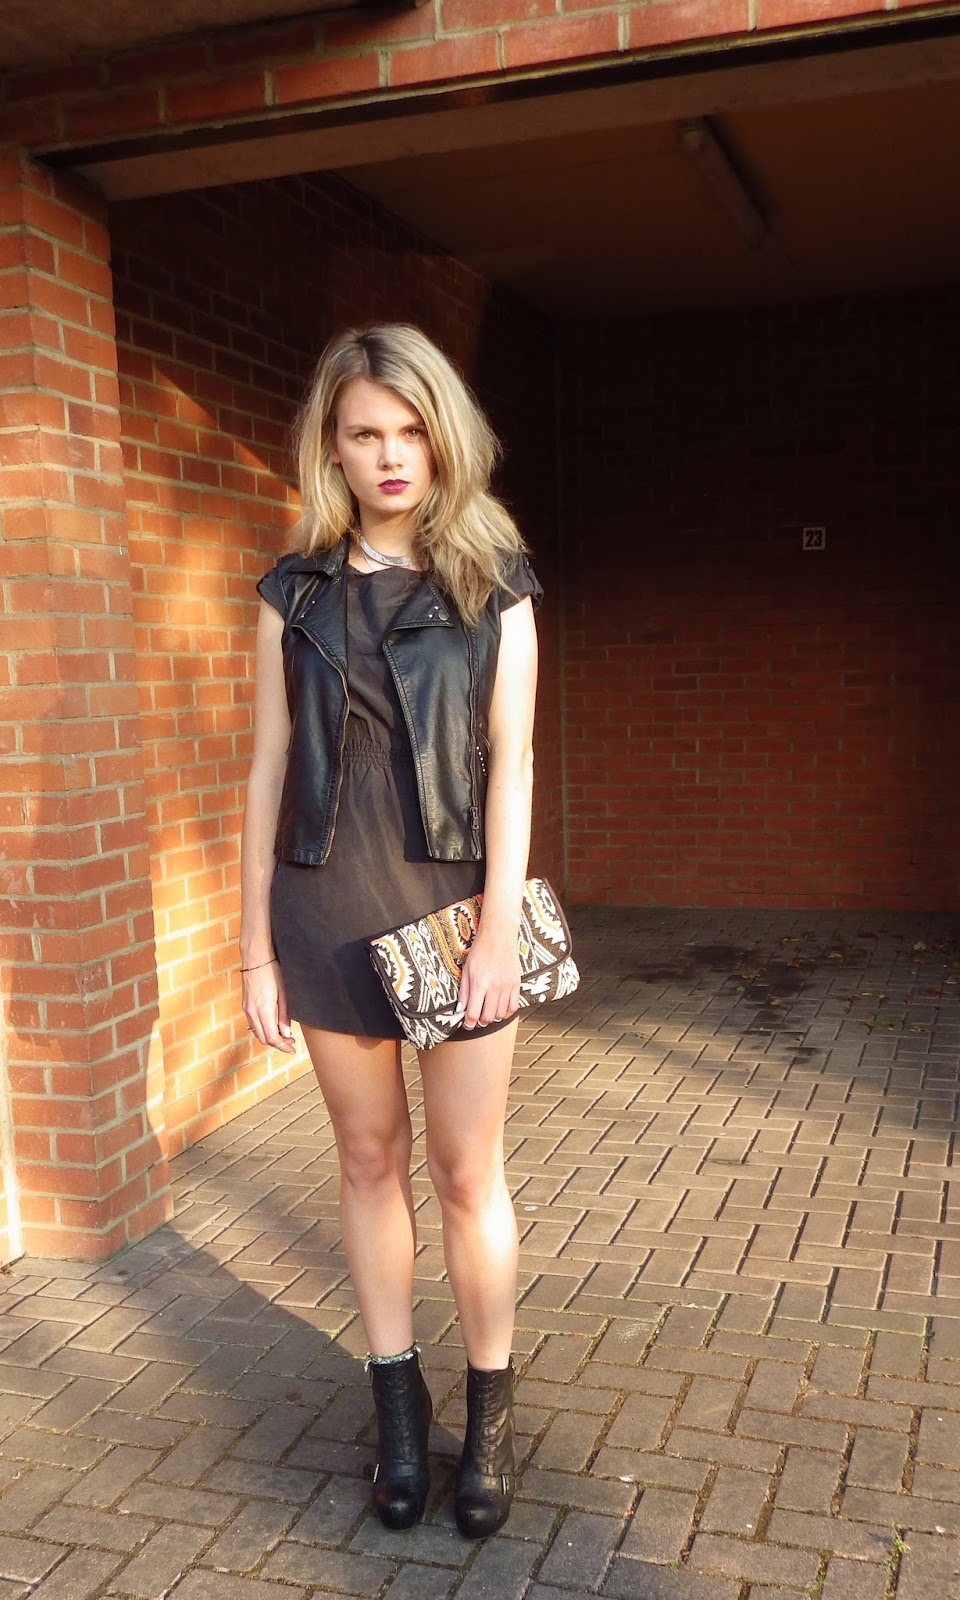
I wanted a cool layered outfit with edgy accessories and came up with this gothic little number...


\
Dress - H&M 
Faux Leather Gilet - Primark DIY
Boots - Topshop "Attitude" boots via Ebay
Clutch - Matalan

I love this outfit! It's so versatile and easy to wear for all sorts of different occasions - you could swap the boots for flats and make it far more casual looking or lose the gilet and pile on a big wooly cardigan instead. 

H&M were doing these simple shift style dresses in a huge range of colours last year and I've got my fingers crossed they'll bring them back this year so I can stock up!

Clutch - HERE

For me, the main talking point (and probably least expensive bit of this outfit) is this beaut of a clutch from Matalan...for £14...holy moley. 

It's ikat/aztec printed, embroidered with tiny orange and gold beads and the perfect size to store all the essentials for a good night out. I dithered over buying it for a couple of weeks as I have so many clutch bags I never use, and then posted it on Instagram for an opinion. Everyone said "buy" and when I popped in to have a nose round, there was only one left in the store...hello fate, thanks for that!

What do you think of this outfit?

T x


Sunday, 16 June 2013

Bloggers Lookbook: May 2013

The Little Magpie - Getting On ABit 

Photo belongs to Amy - http://amybell-thelittlemagpie.blogspot.co.uk

Amy's blog is one of my absolute favourite reads. The outfits she wears on a daily basis are always totally unique and eclectic pulled together with statement jewellery and amaaaaaazing hair but this post really stood out for me. 
A DIY safety pin dress that Liz Hurley would be jealous of, cut out boots and a fedora for an all-black beaut of a look in themselves but mixed with cowboy jewellery and a to-die-for kimono...top of the class Amy! 

Sara Luxe - Choies Choice

Photo belongs to Sara - http://www.saraluxe.com When I was younger I wanted to be a witch. Sadly this was not to be, but if it had been, this is exactly the kind of stylish all black outfit I would wear! 
Sara's looks are always effortlessly cool and she mixes slightly "out-there" pieces with high street staples in a way which turns me green with envy. This little dress with cobwebby type shoulder detail paired with chunky lace up boots and quirky glasses is still making me dribble a month later!


Photo belongs to Lily - http://www.llymlrs.com

Anyone who follows Lily's blog will be aware of her undying love for monochrome outfits. I'm not a massive fan of the look on myself but Lily pulls it off with aplomb by choosing unusual pieces and accessories to add to otherwise simple outfits. 
This look is my all time favourite posts of hers. Those incredible trousers are paired with a plain cold shoulder t shirt to keep all the focus on their print and vibrant colour - love love loveeeeee Lily! 

What do you think of the bloggers looks I've chosen?

T x


Thursday, 30 May 2013

OOTD: Camel Racing


The title of this post is no joke. 

On Monday we travelled to a field in the middle of nowhere to go to a country fair type event with ferris wheel, candyfloss, dog shows and...yes...camel racing! 


I have honestly never seen anything like it! Camels are bloody enormous, definitely a lot bigger than I thought they were and they tower over a 6ft human. The jockeys were more used to riding ponies in gymkhanas than these mighty "ships of the desert" and looked absolutely terrified. As soon as they were mounted the camels were raring to go and then they were off!!


I do like camels. They have eyelashes to die for. But I don't want one as a pet. Thanks but no thanks.


Jacket - Primark (v old) with the sleeves hacked off
Dress - River Island £12 in the sale!

Hope you all had a b.e.a.u.t.i.f.u.l bank holiday weekend! 

T x


Video: Get Ready With Me for Field Day Festival May 2013


The Bank Holiday weekend was craaaaaazy good!

I went to Field Day Festival in Hackney on Saturday for a friends birthday. The weather was set to be wet and cold but we actually had beautiful sunshine alllll daaaaaaay. Honestly, there is nothing better than sitting outside drinking in the sunshine with your friends...bliss

So I got up at 7 am to make a "get ready with me" video before I left! Hell yes, that's dedication right there. I love these kinds of vids so thought I'd have a go at making my own. It's not the most interesting but if you fancy checking out how I did my make up/hair for the day check it out HERE

T x

Sunday, 21 April 2013

DIY Red Velvet Bow

Yesterday I stumbled across a photo of the beautiful Bip Ling wearing a PPQ red velvet hair bow and fell in love. 

A rummage through the scraps box at home confirmed that this bow and I were meant to be as I found an old red velvet sash off one of my grandmothers old ballgowns (this wasn't cut up willy nilly, she was a size 4 ish during the war and her waist is a gazillion times smaller than mine will ever be!)...fate or coincidence, either works for me!

This took me about 45 mins to make and cost nothing, easy peasy. Obviously you could knock one of these up with any large scrap of material you may have lying around, denim or pleather would look amaaaaaaaaazing!

You will need:
  • A large piece of medium to thick weight material (the heavier the material, the better it will hold it's shape)
  • Tape measure or ruler
  • Sharp scissors
  • A glue gun
  • Pins
  • A needle and thread
  • A hair grip
1. Measure and cut the material for your bow and lay it out flat. Simples!
 For my pretty hefty bow I used a piece of velvet measuring roughly 12.5" x 8" but depending on what size you want your measures can be changeable.
As my material is originally from a sash it does have seams running through it but they don't really appear on the velvet side.

2. Use your glue gun along the long edges and fold them up about half an inch - just helps to keep things tidier.


3. Fold the material longways and pin the rough edges together.


4. Use the needle and thread to do a simple running stitch across the top - be careful not to pull your stitching too tight or it will gather the fabric.


5. Once  you've sown the top together, go over your last stitch a couple of times to finish it off and then turn the material inside out to form a tube of material, with the seam you've created in the centre of one side - this will be the back.


6.  Flatten the material and use your glue gun to close the open ends of the tube.


7. Using your thumb and first finger pinch the bow together so that it gathers to form a bow, then pop a pin through the top of the gather to the bottom to hold the shape.
Make sure that the gather is right in the centre of the bow otherwise it will end up looking a little lopsided.


8. Using the scraps from your original fabric cut a length approx 7" x 1.5" then use your glue gun to glue it in half lengthways. 
Remember that if you are using a material like velvet you will need to glue on the non furry side so that the velvety side will be on the outside of the bow. 

9. Dab a little glue on one end of your now shorter and sturdier ribbon of material and attach it to the top of the gather on the centre of the bow - just where you put the pin in to keep the shape. Take the pin out and wrap the rest of the ribbon round the bow tightly to hold the gathers and attach the other end just behind the end you have just stuck down. You should have created a ribbon that runs the whole way round the centre of the bow. 

It should look like this from the front. 

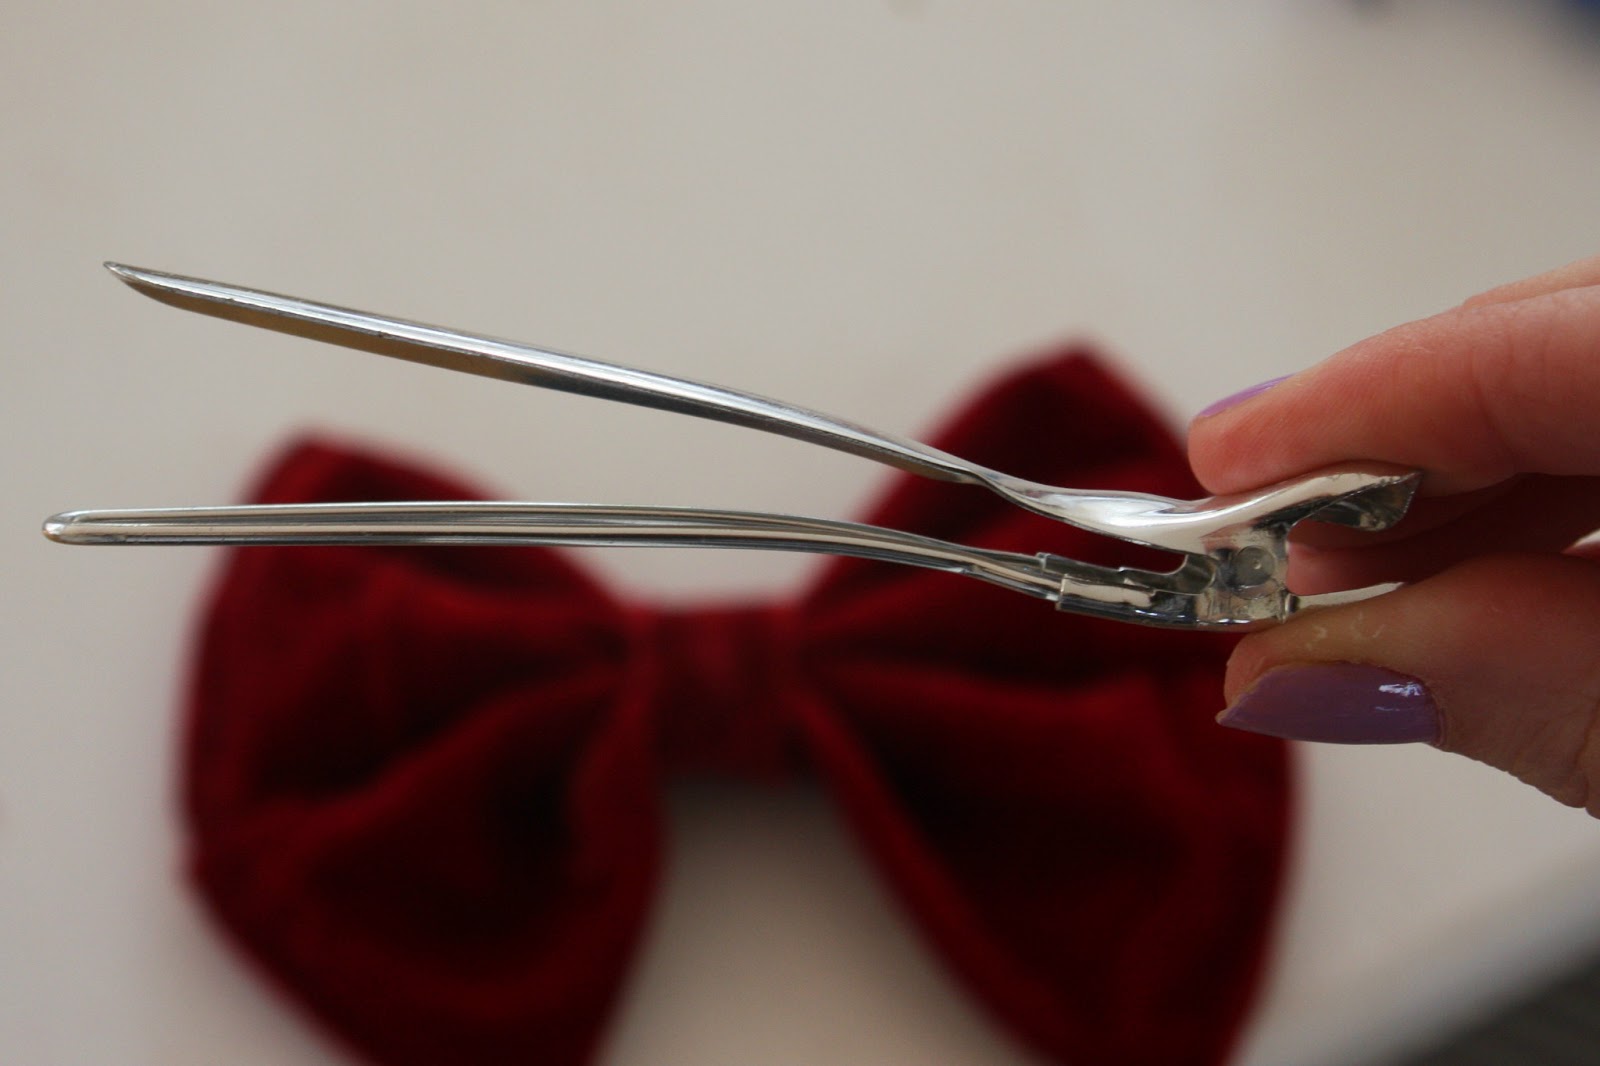
  10. Having created your bow you need to create a means to attach it to hair/clothes etc. As velvet is quite heavy I decided to use a large crocodile style grip that I found lying around which seems to work very well.  


I just slid the larger side of the pin (top side in this picture) underneath the central ribbon of the bow so it sits within the gathers.

Eh voila!


What do you think?


I love the way this brightens up a simple t shirt and am already scouting for a more summery material for my next one and oooooh maybe one with studs in...watch this space!

My beautiful pooch Hector wants one too!

 I'd love to know if any of you have tried making your own versions, just holler at me!

T x


Monday, 15 April 2013

OOTN: Flourescent Adolescent

On Saturday night I went out to a charity event with my boyfriend's family. The dress code was smart casual but I'm not one to pass up an opportunity to dress up to the nines!

I toyed with the idea of buying something new but then stumbled across this H&M beauty I bought last year. It's an amazing structured ombre dress covered with geometric shapes and patterns - a total show stopper! The fitted cap sleeves, tight waist and lantern style skirt make me feel a little bit as if I'm wearing a kimono but I love how the shape of the dress makes my waist look teeny weeny.

Dress - H&M
Shoes - Matalan
Clutch - H&M


I actually took the hem on the dress up 5cm as it was an odd length just above the knee and although I was worried it would change the shape of the skirt, it seems to have held it's form really well. 


The back has an interesting cut out with a single strap down the centre - it's different and the cut out isn't too big that you can't wear a bra with it.


Teamed with beautiful an super-cheap gold pointed courts and my RL patent clutch (freebie of course) I felt like a little fluoro fairy. Even the inevitable "drunken-aunt-at-a-wedding" dance moves I pulled out later in the evening couldn't make this dress look ugly!


Gawd, don't you just love it when you rediscover hidden treasures in your wardrobe?! These are the items that will keep reappearing in Facebook photos from time to time over the years but will continue to look fresh and exciting!

I hope you all had a good weekend. Don't want to jinx it but I have this sneaky suspicion that Spring is finally on it's way...

T x


LOOKBOOK